THE STAGING SCORE
STAGING SCORE
Utilize patented technology to document staging and choreography.
WATCH THE VIDEO TUTORIAL >
STAGING SCORE:
Whiting Method:
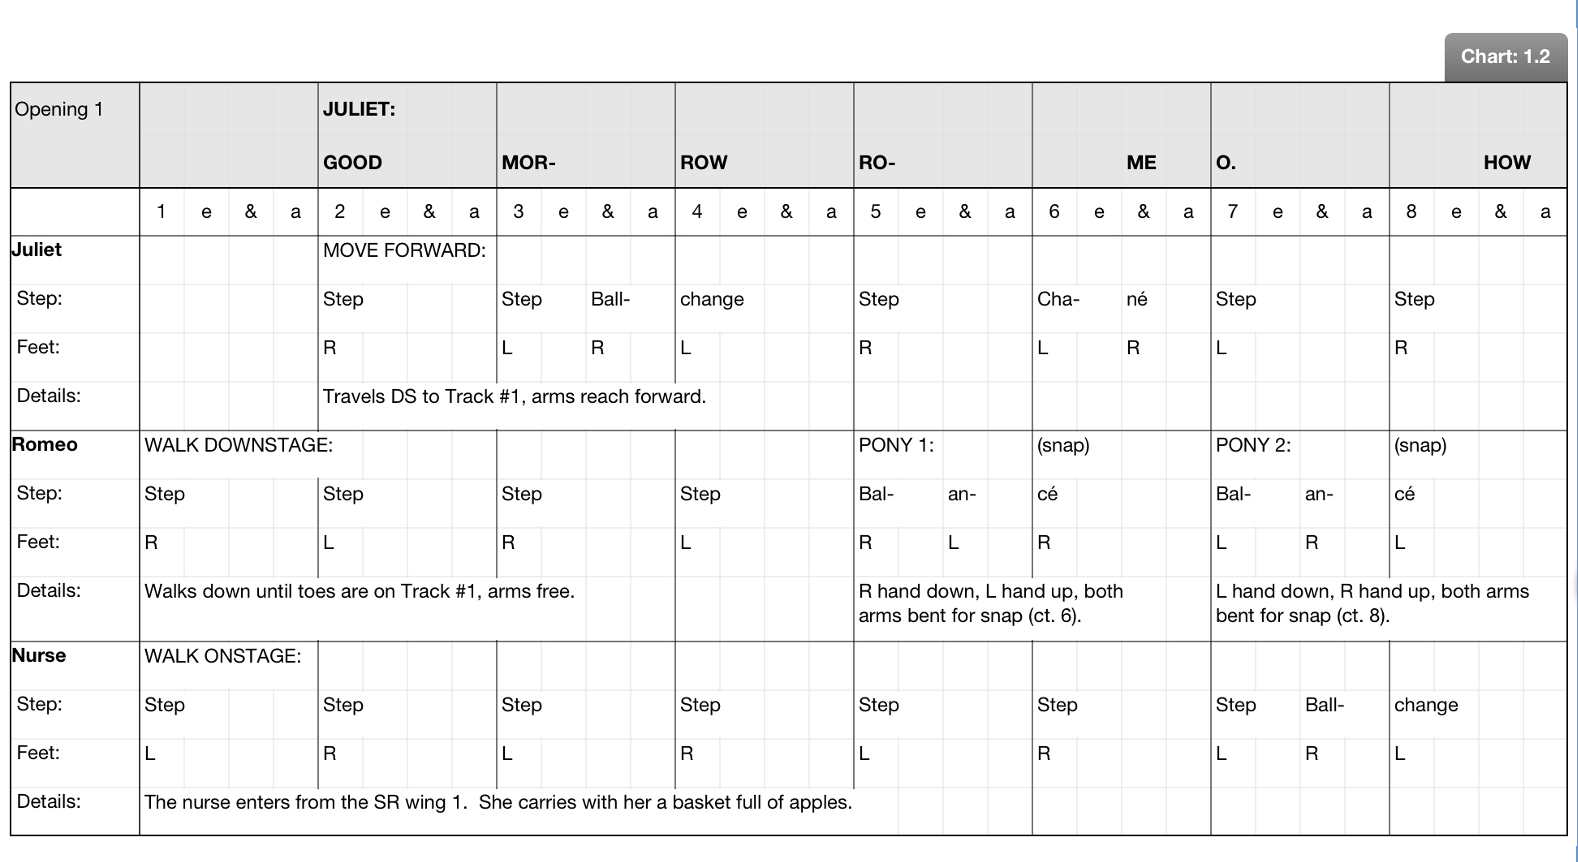
The Whiting Method is a patented method for documenting staging and choreography, aligning the actions of performers, props and scenery with the timeline of action in a play or with counts of music in a musical presentation. This method allows the user to document exactly what each person or element is doing at every moment during the production, called collectively The Staging Score.
Voice Rows: Two rows in the table represent the audio portion of the performance. The top row is to place the name of the speaker. The 2ndrow contains the dialogue heard in time. In a musical presentation, the lyrics are lined up with the counts in the music.
Count Row: Under the voice row is the row for musical counts, for musical presentations that correspond with the voice row.
Performer Detail Rows: Each performer has three rows in which to detail what the performer is doing at every moment in time during the production.
Step Row: The name of the step is listed, ideally in universally accepted terms (ballet, tap, etc.) and the name, or syllable of the step corresponds to the actual count in the music.
Feet Row: The active foot is detailed for the corresponding step.
RIGHT: R (right), RF (right-front), RS (right-side), RB (right-back), RXF (right cross in front), RXB (right cross behind).
LEFT: L (left), LF (left-front), LS (left-side), LB (left-back), LXF (left cross front), LXB (left cross behind).
Detail Row: Any additional details about the movement, or props, or intention, or spacing is detailed in this section, aligned with the counts that correspond.
ADD STAGING SCORE:
In SCORE VIEW, tap ‘+’ and select which type of score you will enter from previously entered templates that exist for that production. Select which performers you want to detail in this moment and tap DONE. This will add a blank staff next in the list of thumbnail list for you to edit.
DIALOGUE STAFF:
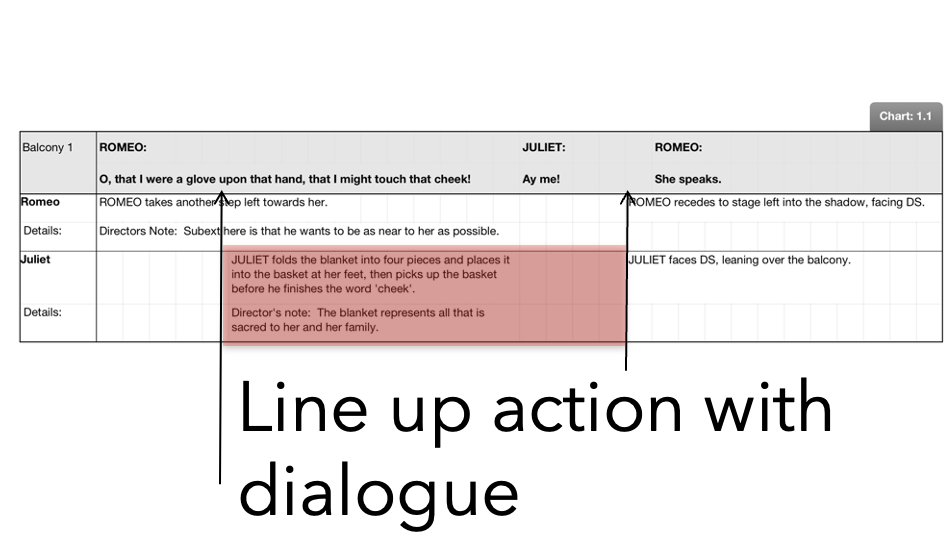
In a dialogue staff where there is no music, there are 32 divisions of time which signify time passing. The dialogue is placed in the voice row and the detail about the performers is entered underneath the dialogue or time passing.
MUSICAL STAFF:
In a musical staff with music, the count row appears across the page to be read similar to how music is read. The counts are divided into sub-beats to allow the detail of specific movement on each count or sub-count for each performer. There are three templates to choose from, including:
8 Count Staff: 8 counts fill the page, sub-divided into four sub-beats as they are in music. 1, e, &, a, 2, e, &, a… Counts can be added or subtracted to match an irregular rhythm.
10 Count Staff: 10 counts fill the page, sub-divided into four beats each as they are in music.
Triplet Staff: 8 counts across the page, sub-divided into three beats as they are in music, 1, &, a, 2, & a, 3, &, a….
Customize Staff: Settings > Staff Templates > Add:
You can create your own custom templates for your production that is more suited for your production.
Template Name: This is the name of your new template which will show up on the list.
Display Name: This name will show up on each score. Leave empty if you want it to be the same.
Prefix Count: If there are musical counts, turning this ON will show the number of counts on that staff. (ie. 8 Count or 7 Count)
Counts and Columns:
Default Counts: Choose the number of counts you want in your staff template. For musical productions, choose something between 1 – 12 counts. For non-musical productions, choose one.
Allow to Add/Delete Counts: Turn ON or OFF the ability to add/delete counts within production without changing the template.
Columns per count: For music productions, choose the number of sub-divisions per count. Normally this is four, but in a triplet this is 3, sometimes 6. For non-musical productions, choose 32. This will give plenty of options to enter data along the timeline.
Count Column Headers: In the Count Row, this is the label that will appear at the top of each division of the counts. For Musicals, say YES.
Count Index Column: Use the + or – symbol to move the COUNT NUMBER into the desired sub-division of the count. Normally this will go into column 1 (the downbeat) . You will see the “(n)” appear in that column. This means in that column the number of that count will appear in that column of the count. (ie. 1 & a, 2 & a). If you placed it in the 2ndcolumn it could go ( a 1 &, a 2 &,…).
ROWS:
Voice Rows: If several people, or groups sing or overlap you can add an additional voice so you can detail each of them separately. Rows appear in pairs.
Number of Detail Rows: The Default from the Whiting System is 3 (Step, Feet, Details) but you can add additional rows to detail more or less. For example, you could add another row and label ‘Arms’ or ‘Focus’ depending on your needs in the detail row labels. When you are happy with your settings, press SAVE.
EDIT STAFF:
Score Thumbnails: The thumbnails of the staging score are found within each scene.
Lock Mode: In lock mode you can swipe through each staff to review.
View Tool: Switch to view charts, or charts and score.
Add Staff:
Press the “+” button and choose which type of staff you want to add next in the scene.
Choose Staff Type: Choose from the templates which type of staff you want to add.
Choose performers: Choose which performers from the production you want to include in this staff.
ENTERING DATA:
Edit detail: To edit the data that goes into the table on the Web: tap on any division of the table. A red box will appear. Once the red box is in the position where you want to insert the information, tap ‘EDIT’, type ‘e’ (for edit), or hit RETURN. This will allow you to type into that division of the table the information you want to enter. Type the information into the row. When you are done typing hit RETURN again and it will save the information.
Format Data: Once you have entered the data into the row, you can:
Edit: Tapping EDIT will allow you to select the text and format the font size, color, bold, italics, or underline as you want.
TIP: On the Web, press SHIFT+ arrow keys to select character by character.
Command Arrow jumps to the end or front.
Option Arrow jumps from word to word.
On iPad, use selection keys for word by word.
Resize: You should resize the action so it aligns with the timeline and dialogue above. Tap RESIZE and drag the blue dots to the division area that corresponds to the appropriate dialogue. For example, if the description of Juliet picking up a prop is a lot of words, but the action itself is quick, make sure the words all align within the allotted time.
Clear: This deletes the contents of the selected area.
Cut: This deletes the contents of the selection but places it on a clipboard.
Copy: This copies the contents of the selection onto a clipboard.
Paste: This pastes the contents from the clipboard.
Done: Tap DONE when you are done editing.
EDITING STAFF:
Add voice: You can add another voice by tapping the + button next to voice on upper left of staff.
Delete Voice Row: Tap the ‘X’ next to voice and then tap the Red ‘X’ at the right side of the row. Then tap the Check mark when you are done.
Re-Order Voice Row: Tap the ‘X’ next to voice and then tap the blue arrows to reorganize the voices. Tap the check mark when you are done.
Additional performer: You can add an additional performer by tapping the + next to the character on bottom left corner of staff. Then, choose from the list of existing performers in the production.
Delete Performer: Tap the ‘X’ next to character in the bottom left corner of staff, then tap the RED ‘X’ to confirm. Then tap the check park when you are done.
Re-Order Performers: Tap the ‘X’ next to character in the bottom left corner of staff, then tap the blue arrows to reorganize. When you are done, tap the check mark.
Re-Order/Copy/Move/Delete Staff:
By pressing the COPY/MOVE/DELETE button under the thumbnails of the score, you can:
Re-order the staff within the scene by grabbing the ‘handle’ on the right side of the thumbnail.
Copy the Staff by selecting the staff (circle turns red), then press COPY and choose which scene you want to copy it into.
Move the Staff: use the same steps as for Copy but press MOVE and select the appropriate scene.
Delete the Staff: use the same steps to select the staff and tap DELETE and then DONE.
FILTER:
You can choose to filter out the information and show only the information pertaining to one or a few performers, allowing you to find the information more easily. This is helpful when putting in a new person into a production. Go to FILTER icon, choose the performer (s) and tap APPLY. This will filter out all the other information in the score.
ZOOM:
The zoom function will allow the staff to fit either the original size or auto-fit to the size of your screen for easier viewing.
SAVE/SYNC:
Data is saved each time you leave a staff so if you are working on a staff for a long period of time, it’s a good idea to hit SAVE frequently so your changes are not lost. On the iPad, make sure you SYNC often to upload the data to the web system.
LINK TO CHARTS:
In Charts & Score view you can link charts with staffs from the score. The left side shows the thumbnail images of the charts in the production and the right side shows the staffs/score for the production. Simply drag the chart that corresponds to the staff to link them together. When printed, the charts that are linked to the staff will print on the left side (back) of the page. NOTE: if there are charts that don’t link to any chart, that chart will not be printed in a hard copy.
PRINT:
See PRINTING in PRODUCTIONS.


