EDITING PDFS
EDITING PDFS
Create your digital calling script by marking up the PDF.
WATCH VIDEO TUTORIAL >
EDITING PDF
SCRIPT:
IMPORTING PDF:
Tap IMPORT SCRIPT icon and select PDF file to import the script into the system. This places the PDF on its own layer in the system. The items you add in the Stage Write system will be saved on a different layer and not the actual PDF so you can easily replace a page without losing your notes.
Replacing Pages: When a line or lyric changes, you can simply replace that page by going to the script view, selecting the page you want to replace, then tap the IMPORT SCRIPT icon from the main menu above. Tap REPLACE CURRENT PAGE, then select the single page PDF to replace that page. This will replace only the PDF. Your notes will not be replaced so you don’t have to re-write your notes.
Inserting Pages: Sometimes additional lines or lyrics will be added and will force the dialogue onto a 2ndpage. In this case you can insert a new page by going to the IMPORT SCRIPT icon from the main menu, go to the page where you want to insert, tap INSERT SCRIPT PAGE, choose ‘before’ or ‘after’ the currently selected page. Then select the new page to insert and simply shift your notes as required.
Delete Page: By tapping the IMPORT SCRIPT icon from the main menu, tap DELETE CURRENT PAGE, confirm.
NAVIGATING THE SCRIPT:
The arrow keys allow you to navigate through the production, page by page, or all the way to the front (double arrow) or all the way to the end (double arrow).
Bookmark Tool: Add a bookmark anywhere in the script to jump to that section of the PDF. Press the bookmark icon to reveal the bookmark list on the left side of the screen. Tap on any bookmark to jump to that section, or use the arrow (fwd or back) to jump to the next bookmark. To ADD a bookmark, tap ‘edit’ and then tap on the script area where you want to place the bookmark. Type the name of the bookmark, and then tap on the bookmark icon at the top of the screen. The new bookmark will appear in the list of bookmarks in the order it occurs in the PDF. To delete a bookmark, tap ‘edit’ and press the “X” on the anchor in the script for that bookmark.
Go To Command: If you want to jump to a specific page, tap on the ‘Page _ of _’ in the middle of the arrows. This will open a dialogue box where you can enter the page number you want. Hit ‘GO’ and it will jump you to that page.
CREATING A DIGITAL CALLING SCRIPT:
Create your calling script or blocking book/show manual by adding notes and cues to your script.
LAYERS:
Add layers to your script to place notes and markings for individual departments by tapping the Layer Icon to show the layer list on the left side of the screen. You can show or hide any of the layers at any time by toggling the view icon next to each layer (or for all layers). The default layers are LQ (Lighting) and SQ (Sound) and you can add or edit these layers according to your needs. On each layer you can markup with the following tools:
Adding Light Cues: Script View > LQ
With LQ (light cue) button selected (in red), draw a box around the anchor in the script by clicking and dragging to select that area. A box will appear around that word or cue in the script. Choose whether you want the LQ to go to the right side or left side of the page. Once you choose, a 2nd box will appear with ‘LQ’ on that side of the page. Just type the cue number in the box and place the box in the available white space on the page.
Editing Light Cue:
Select the Cue: To edit the already created cue, tap on the cue number, not the anchor to enable editing.
Add Additional Lines: If you want to add another cue to the same anchor, just hit RETURN key and you can type on another line.
Re-size cue box: If you want to adjust the size of the box, grab the lower right corner of the box to resize.
Moving cue box: If you want to move the box to a different location, grab it with the repositioning tool at the top left corner of the box.
Delete Cue box: Tap the ‘X’ at the top right corner to delete the cue.
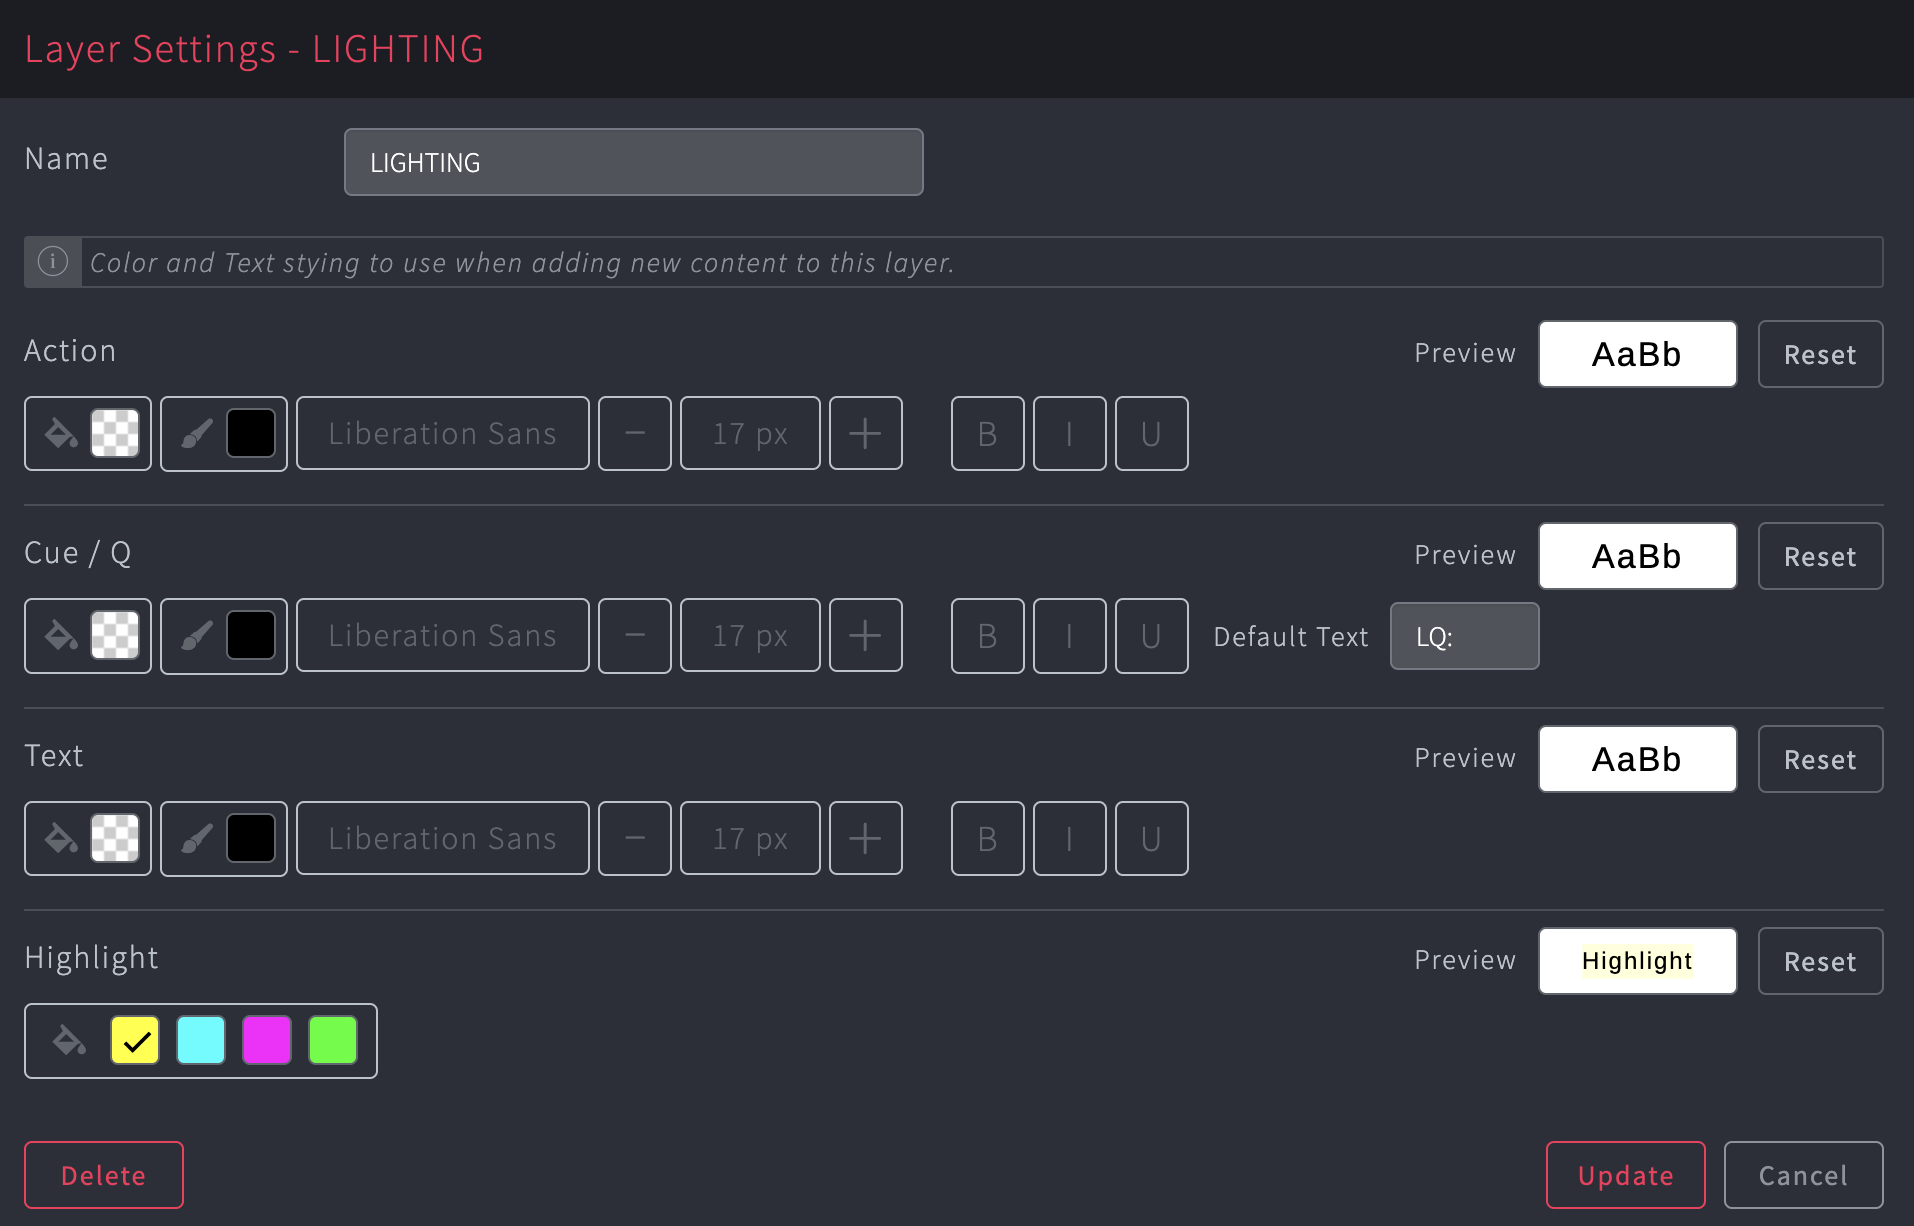
Customize Each Layer: By pressing the overflow menu on the right edge of the layer list, you can customize the style format of each layer (font size, color) and see the preview of each style. You can customize the name of the layer. The Cue feature has a default text which will appear at the beginning of each cue you add to save you time of typing. For example, default for Lighting Layer is “LQ:” allowing for time to be spent only typing the # and not the “LQ” each time. You can adjust this in the ‘default text’ area in the Cue customization. Once you have settled the styles, press UPDATE. This will update any future items you add but will allow the past items to retain previous settings.
Add Action:
Select the action icon (in red) on the script view. Draw a box around the anchor cue in the script. Choose if you want the action to go to the left or the right side of the page and type the action, resize the box to fit in the white space available on the script. Resizing action box is the same as with light cues.
Add Text Box
Select the text box icon from the main menu in script view, draw a box in the white space where you want to place the text box. Type the information inside the text box, resize the box until it looks the way you want it to appear on the page.
Highlight Lines
Select the 'highlight’ icon from the main menu in script view, and then draw a box around the text you wish to highlight. If you wish to change the color of the highlight tap on the paint icon at the top center of the highlighted section. Once you change colors that color will be active until you choose a different color.
Freehand Draw:
Select the ‘drawing’ tool to draw freehand on your PDF page. With this tool selected you can draw anywhere on the page. A freehand toolbox appears on the right of the screen which allows you to: Select a pen-stroke, select pen color, select an eraser tool, or delete all freehand markings on the page.
Show/Hide Cues and Notes:
Tap the VIEW icon to SHOW or HIDE all the cues in the script. This is useful if you want to print a clean copy for someone without showing all the notes and details that apply to you.
Un-Do/Re-Do: Use the undo or redo buttons.
Save: Be sure to save your work often so you don’t lose work by pressing the ‘save’ icon.
Printing PDFS: You can choose to print your PDF alone, or with the linked charts by selecting the print icon and selecting which type of PDF you want to create. This will generate a PDF which will appear at the bottom of the print menu which you can download to your device to share or print hard copies. Whichever layers you have selected when you hit PRINT will be the layers printed in the PDF so you can customize each PDF accordingly.
LINKING CHARTS: Charts & PDF
Charts can be linked to a section of the script page by going to the Charts and PDF View. On the left side are the chart thumbnails from the production. On the right side is the script. To link a chart to a script, just select the portion of the page on the script by clicking on the script and dragging down until you have selected the portion of the page that applies to that chart. Then, drag the chart thumbnail into the section of the script. When a chart has been linked to the script, a gray box will show which chart number is linked. You can adjust the size, location, or even delete the link by using the tools on the corners of the box.
TIP: The grey boxes will not appear in the other views of the production, nor when the script is printed as it would likely interfere with light cues and notes already placed in the white space. However, the charts will be printed on the back of the page when a combined charts/script PDF is created.


